
Amazon SageMaker Unified Studio offers a unified expertise for utilizing information, analytics, and AI capabilities. SageMaker Unified Studio now helps trusted id propagation (TIP) for SQL workloads, enabling fine-grained information entry management based mostly on particular person consumer identities. Organizations can use this integration to handle information permissions by means of AWS Lake Formation whereas utilizing their present single sign-on (SSO) infrastructure.
Organizations already utilizing Amazon Redshift with TIP can lengthen their present Lake Formation permissions to SageMaker Unified Studio. Customers merely log in by means of SSO and entry their licensed information utilizing the SQL editor, sustaining constant safety controls throughout their analytics atmosphere.
This submit demonstrates methods to configure SageMaker Unified Studio with SSO, arrange tasks and consumer onboarding, and entry information securely utilizing built-in analytics instruments.
Resolution overview
For our use case, a retail company is planning to implement gross sales analytics to establish gross sales patterns and product classes which might be doing nicely. This can assist the gross sales workforce enhance on gross sales planning with focused promotions and assist the finance workforce plan budgeting with higher stock administration. The company shops a buyer desk in an Amazon Easy Storage Service (Amazon S3) information lake and a store_sales desk in a Redshift cluster.
The company makes use of SageMaker Unified Studio because the UI, with customers onboarded from their id supplier (IdP) to AWS IAM Identification Middle with TIP. Amazon SageMaker Lakehouse centralizes information from Amazon S3 and Amazon Redshift, and Lake Formation offers fine-grained entry management based mostly on consumer id. For our instance use case, we discover two completely different customers. The next desk summarizes their roles, the instruments they use, and their information entry.
| Consumer | Group | Instrument | Information Entry |
| Ethan (Information Analyst) | Gross sales | Amazon Athena for interactive SQL evaluation | Non-sensitive buyer information (id, c_country, birth_year) and store_sales full desk entry |
| Frank (BI Analyst) | Finance | Amazon Redshift for studies and visualization | US buyer information (c_country='US') |
The next diagram illustrates the answer structure.
SageMaker Unified Studio with IAM Identification Middle simplifies the consumer journey from authentication to information evaluation. The workflow consists of the next steps:
- Customers register with organizational SSO credentials by means of their IdP and are redirected to SageMaker Unified Studio.
- Customers configure IAM Identification Middle authentication for Amazon Redshift, linking id administration with information entry.
- Customers entry the question editor for Amazon Redshift or SageMaker Lakehouse, triggering IAM Identification Middle federation to generate session and entry tokens.
- SageMaker Unified Studio retrieves consumer authorization particulars and group membership utilizing the session token.
- Customers are authenticated as IAM Identification Middle customers, able to discover and analyze information utilizing Amazon Redshift and Amazon Athena.
To implement our resolution, we stroll by means of the next high-level steps:
- Arrange SageMaker Lakehouse sources.
- Create a SageMaker Unified Studio area with SSO and TIP enabled.
- Configure Amazon Redshift for TIP and validate entry.
- Validate information entry utilizing Amazon Athena.
Conditions
Earlier than you start implementing the answer, you should have the next in place:
- In the event you don’t have an AWS account, you may enroll for one.
- We offer utility scripts to assist arrange numerous sections of the submit. To make use of them:
- Proper-click this hyperlink and save the utility scripts zip file.
- Unzip the file to a terminal that has the AWS Command Line Interface (AWS CLI) configured. You can too use AWS CloudShell.
- Run the scripts solely when prompted within the related sections.
- To deploy the infrastructure, right-click this hyperlink and choose ‘Save Hyperlink As’ to put it aside as
sagemaker-unified-studio-infrastructure.yaml. Then add the file when creating a brand new stack within the AWS CloudFormation console, which can create the next sources:- An S3 bucket to carry the client information used on this submit.
- An AWS Identification and Entry Administration (IAM) position known as
DataTransferRolewith permissions as outlined in Conditions for managing Amazon Redshift namespaces within the AWS Glue Information Catalog. - An IAM position known as
IAMIDCRedshiftRole, which can be used later to arrange the IAM Identification Middle Redshift software. - An IAM position known as
LakeFormationRegistrationRole, following the directions in Necessities for roles used to register places, and obligatory IAM insurance policies.
- In the event you don’t have a Lake Formation consumer, you may create one. For this submit, we use an admin consumer. For directions, see Create a knowledge lake administrator.
- If IAM Identification Middle is just not enabled, seek advice from Enabling AWS IAM Identification Middle for directions to allow it.
- If you might want to migrate present Redshift customers and teams, use the IAM Identification Middle Redshift migration utility.
- For a fast approach to take a look at the function and familiarize your self with the method, we offer a script to generate mock customers and teams. Run the
setup-idc.shscript, which is supplied in Step 2, to create take a look at customers and teams in IAM Identification Middle for demonstration functions.
- Combine IAM Identification Middle with Lake Formation. For directions, see Connecting Lake Formation with IAM Identification Middle.
- Register the S3 bucket as a knowledge lake location:
- On the Lake Formation console, select Information lake places within the navigation pane.
- Select Register location.
- For the position, use
LakeFormationRegistrationRole.
- Create an IAM Identification Middle Redshift software, as detailed in our earlier submit:
- On the Amazon Redshift console, select IAM Identification Middle connections within the navigation pane and select Create software.
- For each the show title and software title, enter
redshift-idc-app. - Set the IdP namespace to
awsidc. - Select
IAMIDCRedshiftRolebecause the IAM position. - Select Subsequent to create the applying.
- Pay attention to the applying Amazon Useful resource Title (ARN) to make use of in subsequent steps. The ARN format is
arn:aws:sso::.:software/ssoins- /apl-
- In the event you don’t have present Redshift tables to work with, run the script
setup-producer-redshift.sh, which is supplied in Step 2, to create a producer namespace and workgroup, arrange a pattern gross sales database, and generate obligatory tables with take a look at information. - The submit additionally makes use of simulated buyer information saved within the AWS Glue Information Catalog. To arrange this information and configure the required Lake Formation permissions, run the
setup-glue-tables-and-access.shscript supplied in Step 2.
Notice: The utility scripts are configured for
us-east-1 area. In the event you want one other area, edit the area within the scripts earlier than operating them.
Arrange SageMaker Lakehouse sources
On this part, we configure the foundational lakehouse sources required for SageMaker to entry and analyze information throughout a number of storage programs. We’ll register the Redshift occasion to the AWS Glue Information Catalog to make warehouse information discoverable and set up Lake Formation permissions on lakehouse sources for consumer identities to make sure safe, ruled entry to each information lake and information warehouse sources from inside SageMaker environments.
Register Redshift occasion to the Information Catalog
On this step, we use the store_sales information, which we created earlier utilizing the setup-producer-redshift.sh script. You possibly can register whole clusters to the Information Catalog and create catalogs managed by AWS Glue. To register a cluster to the Information Catalog, full the next steps:
- On the Lake Formation console, select Administrative roles and duties within the navigation pane.
- Underneath Information lake directors, select Add.
- Select Learn-only administrator, then select
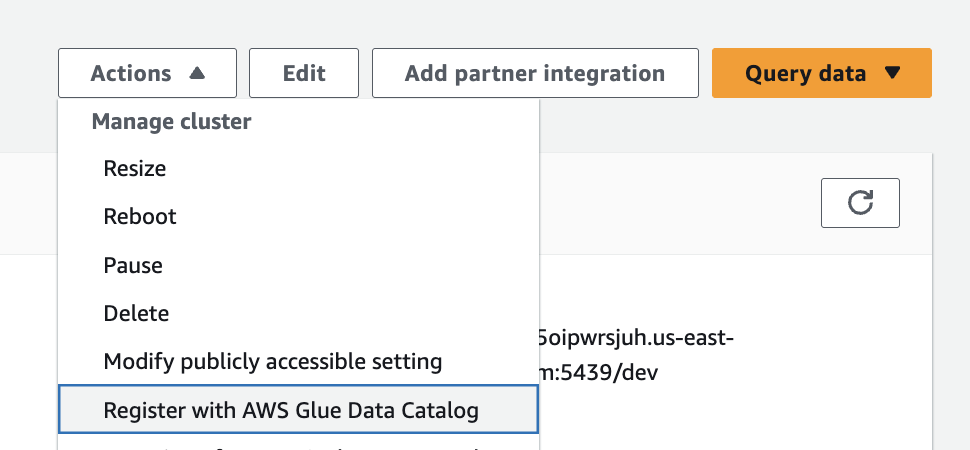
AWSServiceRoleForRedshift. - On the Amazon Redshift console, open your namespace.
- On the Actions dropdown menu, selected Register with AWS Glue Information Catalog, then select Register.
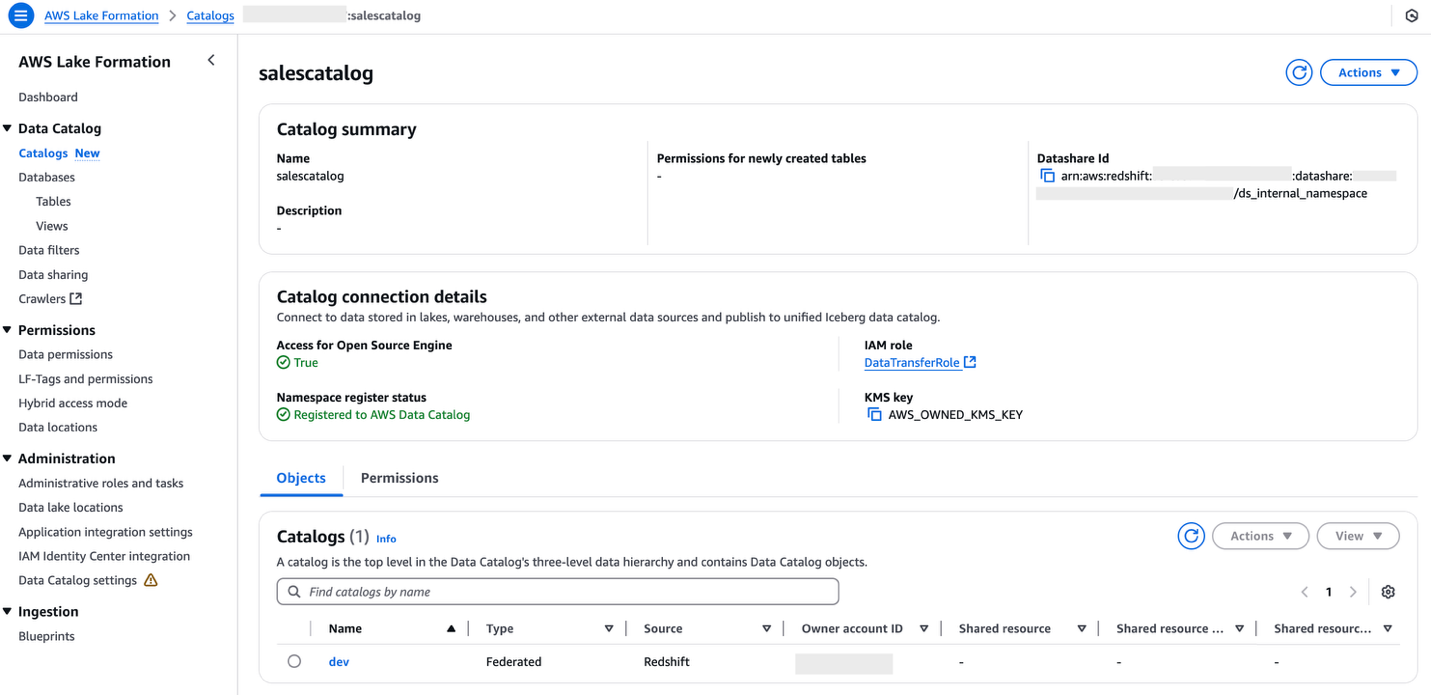
- Register to the Lake Formation console as the info lake administrator and select Catalogs within the navigation pane.
- Underneath Pending catalog invites, choose the namespace and settle for the invitation by selecting Approve and create catalog.

- Present the title for the catalog as
salescatalog. - Choose Entry this catalog from Apache Iceberg suitable engines, select
DataTransferRolefor the IAM position, then select Subsequent. - Select Add permissions and select the admin IAM position below IAM customers and roles.
- Choose Tremendous consumer for catalog permissions and select Add.
- Select Subsequent.
- Select Create catalog.
Arrange Lake Formation permission on lakehouse sources for consumer identities
On this part, we configure Lake Formation permissions to allow safe entry to lakehouse sources for federated consumer identities. Lake Formation offers fine-grained entry management that works seamlessly with IAM Identification Middle, permitting you to handle permissions centrally whereas sustaining safety boundaries.
We’ll give attention to granting database entry to IAM Identification Middle teams in Lake Formation and setting table-level permissions for federated Redshift catalog tables. These permissions kind the safety basis for our federated question structure, enabling customers to seamlessly entry each S3 information lake and Redshift information warehouse sources by means of a unified interface.
Grant database entry to IAM Identification Middle teams in Lake Formation
After you share your Redshift catalog with the Information Catalog and combine with Lake Formation, you should grant acceptable database entry. Observe these steps to arrange permissions in your information lake sources for company identities:
- On the Lake Formation console, below Permissions within the navigation pane, select Information permissions.
- Select Grant.
- Choose Principals for Principal sort.
- Underneath Principals, choose IAM Identification Middle and select Add.
- Within the pop-up window, if that is your first time assigning customers and teams, select Get began.
- Seek for and choose the IAM Identification Middle teams
awssso-salesandawssso-finance. - Select Assign.
- Underneath LF-Tags or catalog sources, select Named Information Catalog sources.
- Select
:salescatalog/dev - Select
sales_schemafor Database.
- Select
- Underneath Database permissions, choose Describe.
- Select Grant to use the permissions.
Grant table-level permissions for federated Redshift catalog tables
Full the next steps to grant desk permissions to the IAM Identification Middle teams:
- On the Lake Formation console, below Permissions within the navigation pane, select Information permissions.
- Select Grant.
- Choose Principals for Principal sort.
- Underneath Principals, choose IAM Identification Middle and select Add.
- Within the pop-up window, if that is your first time assigning customers and teams, select Get began.
- Seek for and choose the IAM Identification Middle group
awssso-sales. - Select Assign.
- Underneath LF-Tags or catalog sources, select Named Information Catalog sources.
- Select
:salescatalog/dev - Select
sales_schemafor Database. - Select
store_salesfor Desk.
- Select
- Choose Choose and Describe for Desk permissions.
- Select Grant to use the permissions.
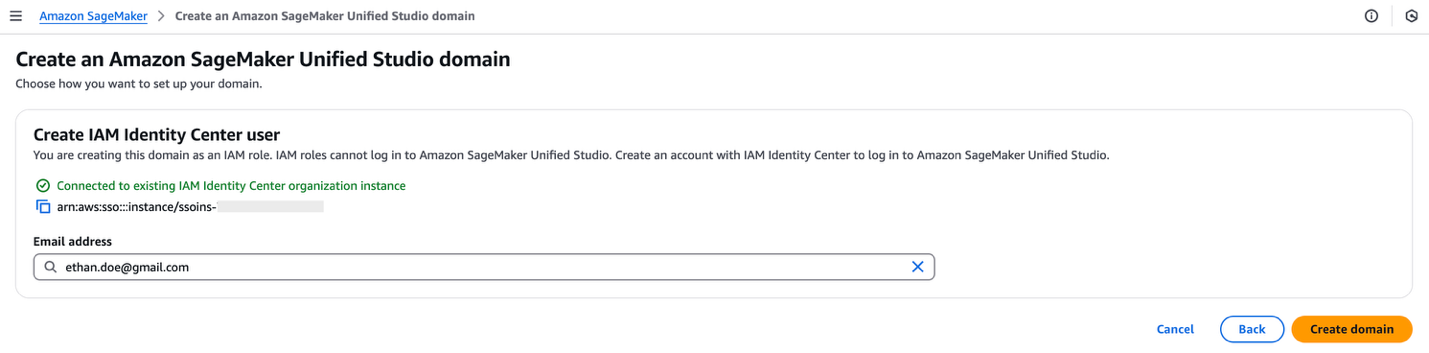
Create a SageMaker Unified Studio area with SSO and TIP enabled
For directions to create a SageMaker Unified Studio area, seek advice from Create an Amazon SageMaker Unified Studio area – fast setup. As a result of your IAM Identification Middle integration is already full, you may specify an IAM Identification Middle consumer within the area configuration settings.
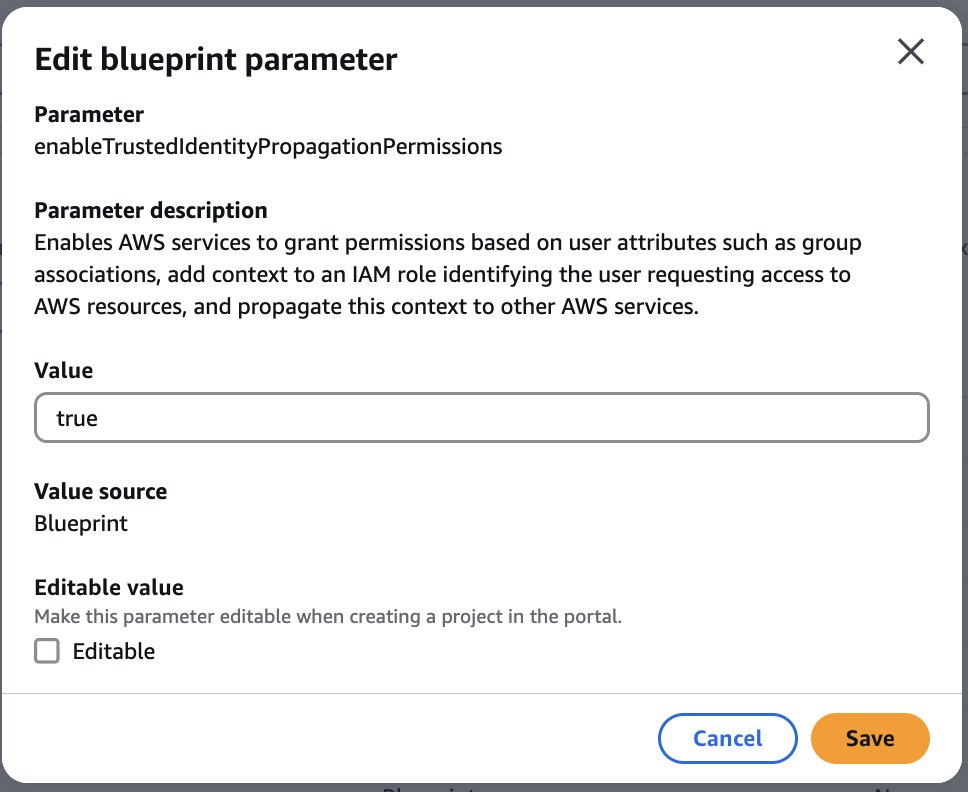
Allow TIP in SageMaker Unified Studio
Full the next steps to allow TIP in SageMaker Unified Studio:
- On the SageMaker console, use the AWS Area selector within the high navigation bar to decide on the suitable Area.
- Select View domains and select the area’s title from the record.
- On the area’s particulars web page, on the Mission profiles tab, select a undertaking profile, for instance, SQL analytics.
- Choose SQL analytics and select Edit.
- Within the Blueprint parameters part, choose
enableTrustedIdentityPropagationPermissionsand select Edit.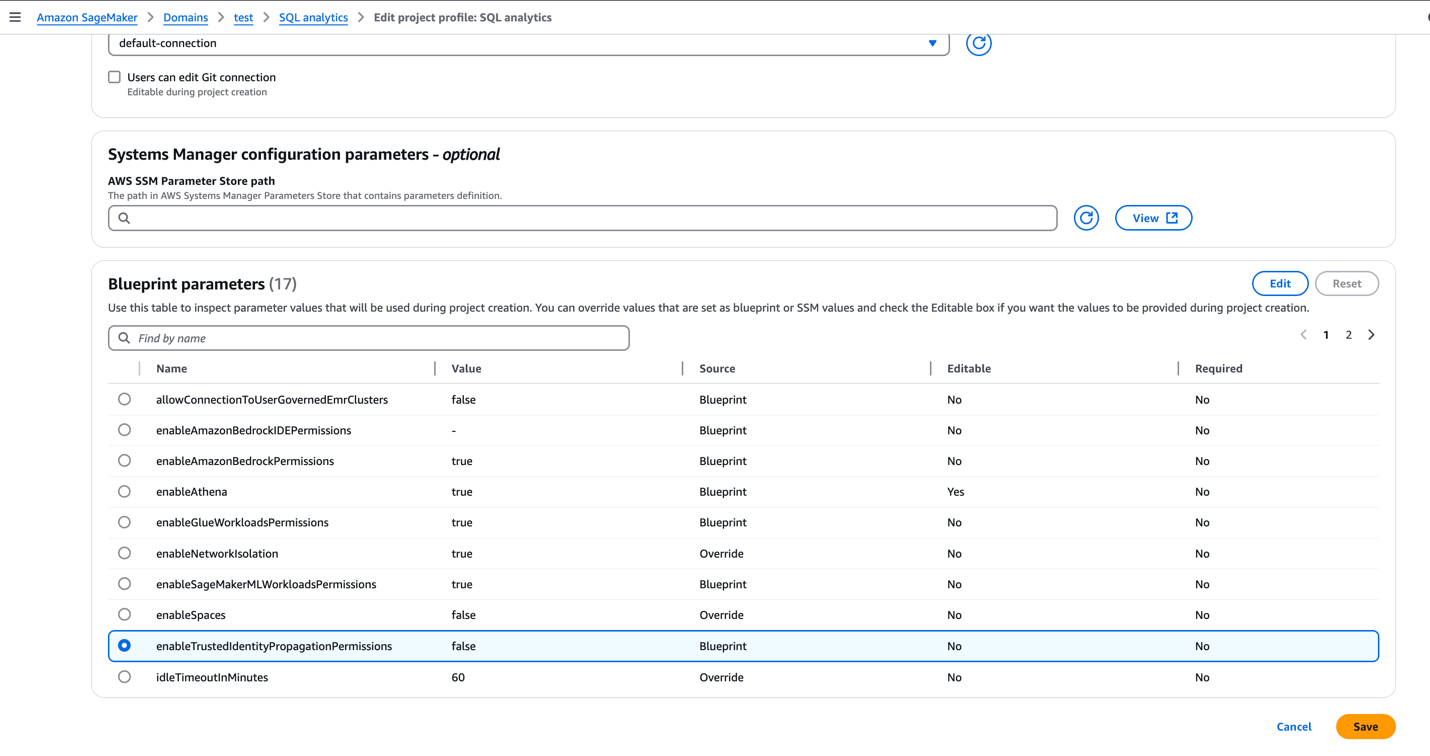
- Replace the worth as
true. - To implement authorization-based on TIP, the SageMaker Unified Studio admin could make this parameter non-editable.
- Select Save.
Allow consumer entry for SageMaker Unified Studio area
Full the next steps to allow consumer entry for the SageMaker Unified Studio area:
- Open the SageMaker console within the acceptable Area and select Domains within the navigation pane.
- Select an present SageMaker Unified Studio area the place you wish to add SSO consumer entry.
- On the area’s particulars web page, on the Consumer administration tab, within the Customers part, select Add and Add SSO customers and teams.
- Select the consumer (for this submit, we add the consumer Frank) from the dropdown record and select Add customers and teams.
Add undertaking members
SageMaker Unified Studio tasks facilitate workforce collaboration for various enterprise initiatives. Because the undertaking proprietor, Ethan now can add Frank as a workforce member to allow their collaboration. So as to add members to an present undertaking, full the next steps:
- Register to the SageMaker Unified Studio console utilizing the SSO credentials of who owns the undertaking (for this submit, Ethan).
- Select Choose a undertaking.
- Select the undertaking you wish to edit.
- On the Mission overview web page, develop Actions and select Handle members.
- Select Add members.
- Enter the title of the consumer or group you wish to add (for this submit, we add Frank).
- Choose Contributor if you wish to add the undertaking member as a contributor.
- (Non-compulsory) Repeat these steps so as to add extra undertaking members. You possibly can add as much as eight undertaking members at a time.
- Select Add members.
Create a SQL analytics undertaking in Unified Studio
On this step, we federate into SageMaker Unified Studio and create a undertaking utilizing SQL analytics. Full the next steps:
- Federate into SageMaker Unified Studio utilizing your IAM Identification Middle credentials:
- On the SageMaker console, select Domains within the navigation pane.
- Copy the SageMaker Unified Studio URL on your area and enter it into a brand new browser window.
- Select Register with SSO.
- A browser pop-up will redirect you to your most popular IdP login web page, the place you enter your IdP credentials.
- If authentication if profitable, you’ll be redirected to SageMaker Unified Studio.
- After logging in, select Create undertaking.
- Enter a reputation on your undertaking. This undertaking title is ultimate and might’t be modified later.
- (Non-compulsory) Enter an outline on your undertaking. You possibly can edit this later.
- Select a undertaking profile. For this demo, we select the SQL analytics profile from the obtainable templates.
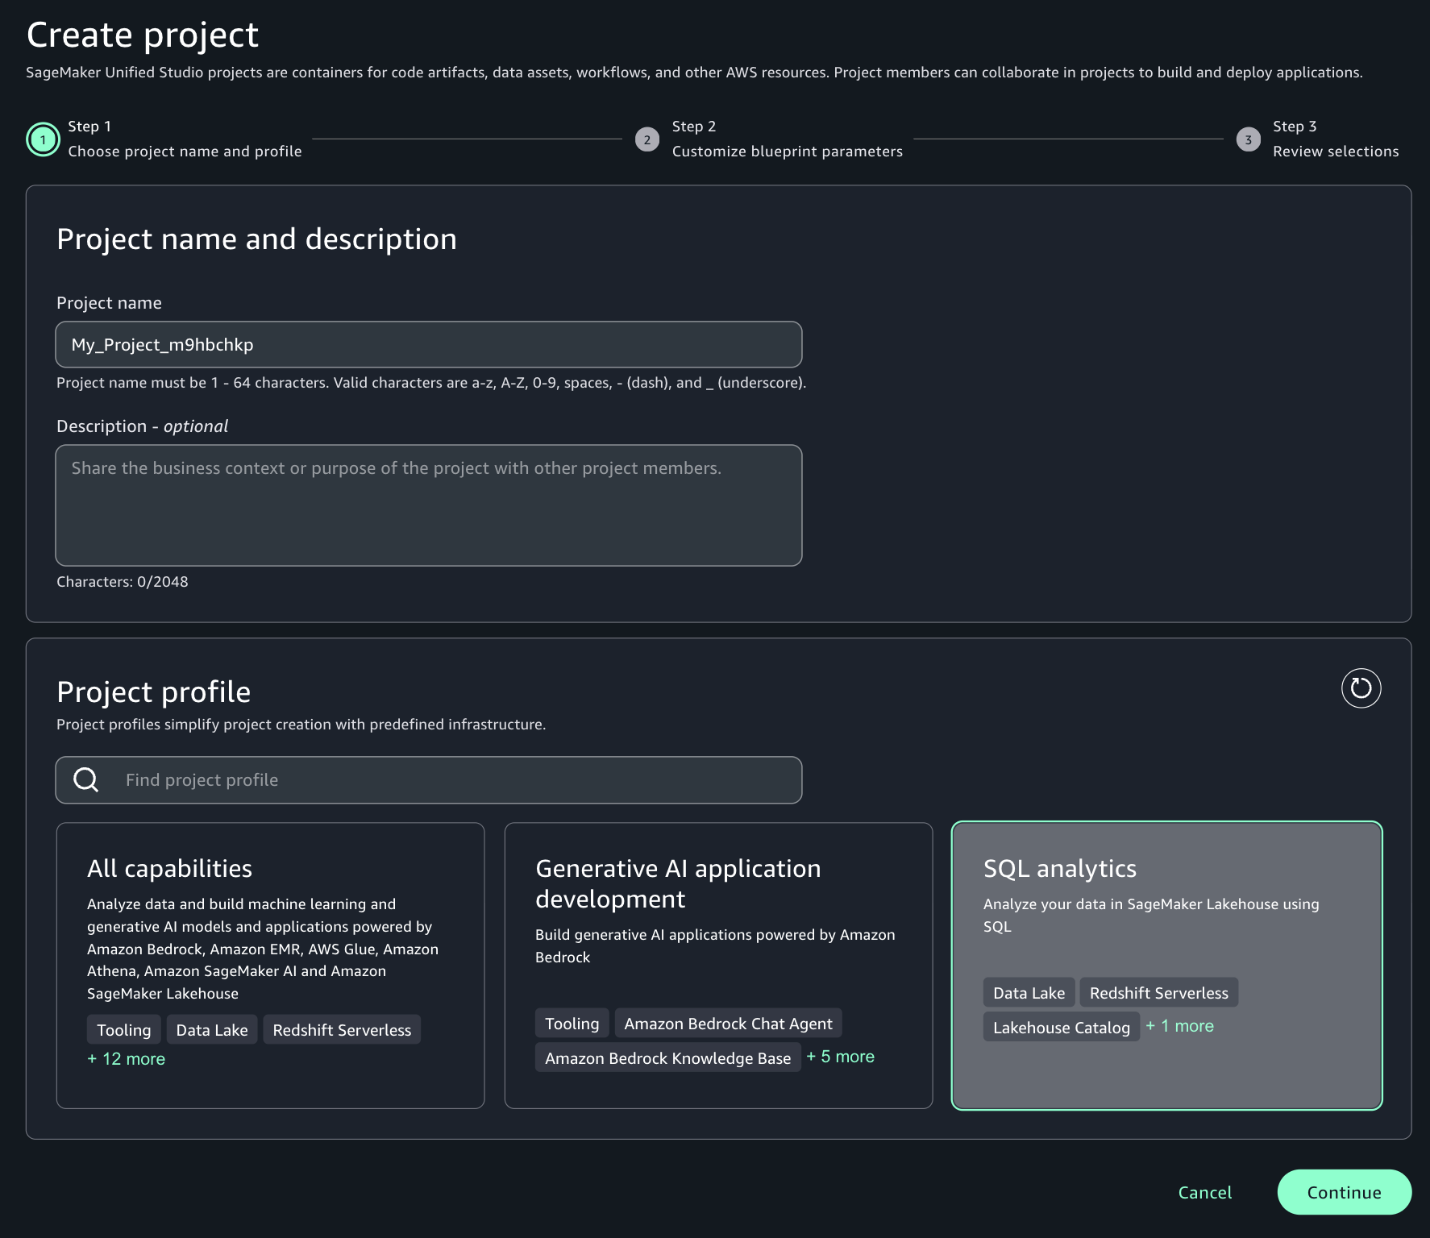
- Depart the default values as they’re or modify them based on your use case, then select Proceed.
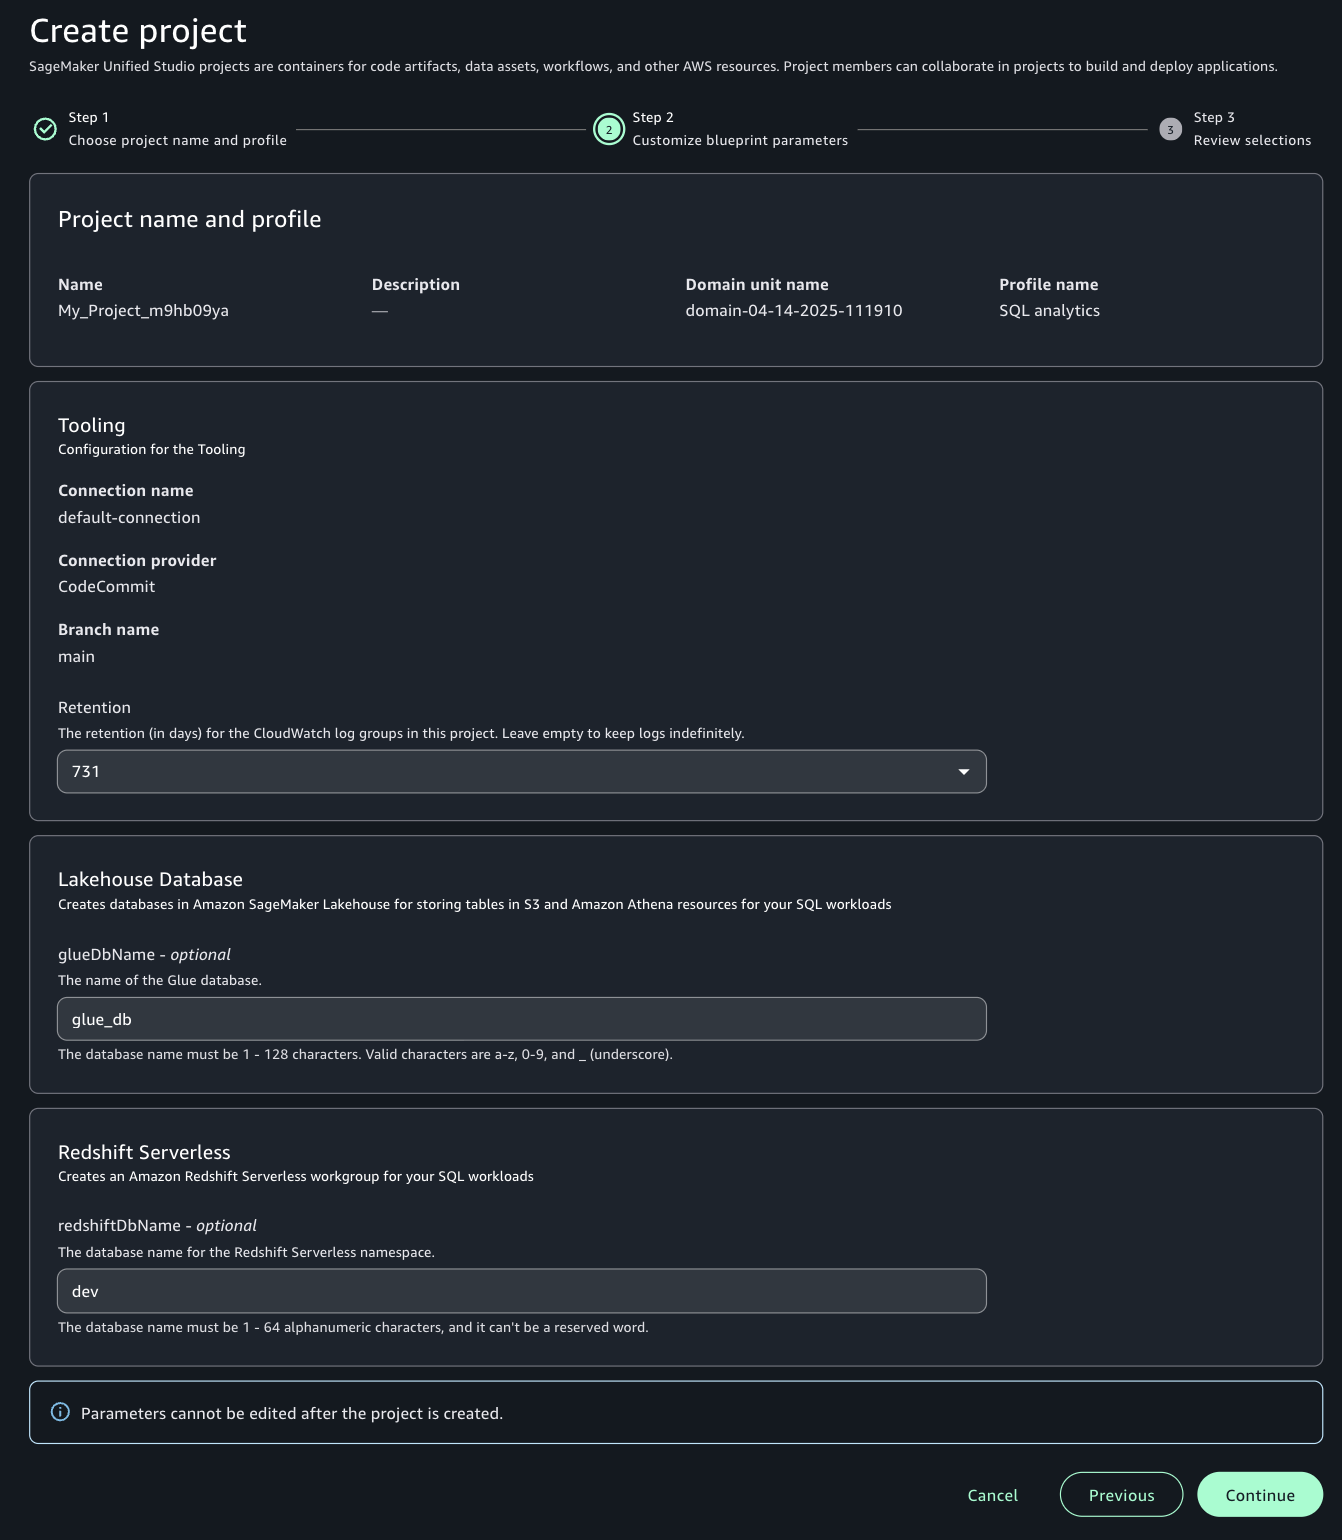
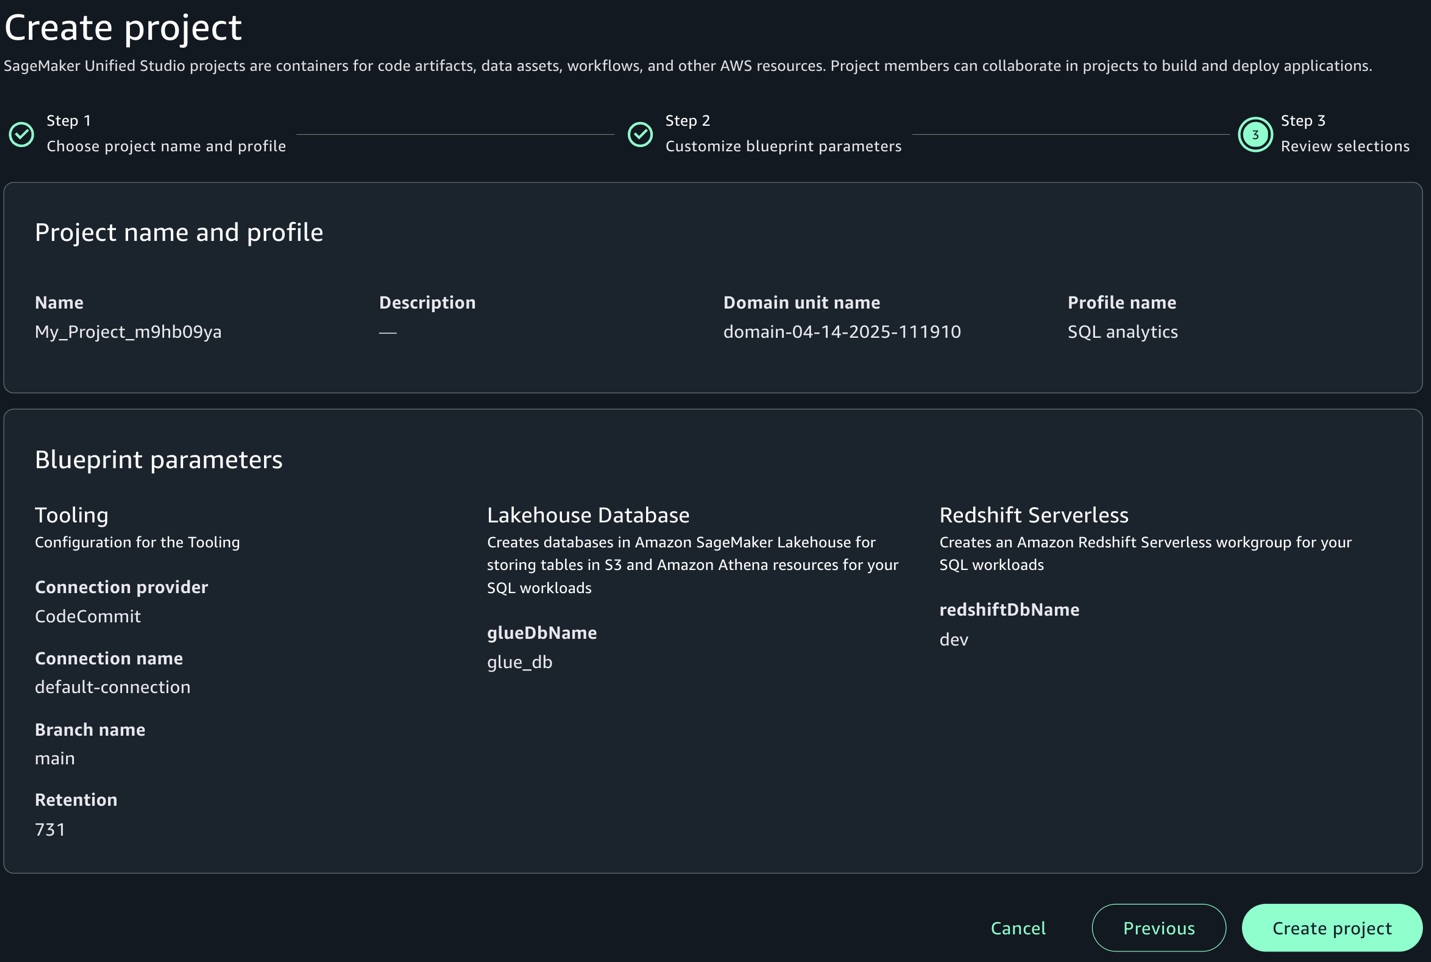
- Select Create undertaking to finalize the undertaking and initialize your SQL analytics workspace.
For extra detailed data and superior configurations, seek advice from Create a undertaking.
Configure Amazon Redshift for TIP and validate entry
Run the setup-consumer-redshift.sh script (supplied within the conditions). This script will create a brand new namespace and workgroup and add the required tags, which you’ll use later to combine with SageMaker Unified Studio compute.
If you’re creating the cluster manually, add one of many following tags to the Redshift cluster or workgroup that you simply wish to add to SageMaker Unified Studio:
- Possibility 1 – Add a tag to permit solely a selected SageMaker Unified Studio undertaking to entry it:
AmazonDataZoneProject= - Possibility 2 – Add a tag to permit all SageMaker Unified Studio tasks on this account to entry it:
for-use-with-all-datazone-projects=true
Create compute utilizing IAM Identification Middle authentication
After you arrange your undertaking, the following step is to ascertain a compute useful resource connection on the SageMaker Unified Studio console. Observe these steps so as to add both Amazon Redshift Serverless or a provisioned cluster to your undertaking atmosphere:
- Go to the Compute part of your undertaking in SageMaker Unified Studio.
- On the Information warehouse tab, select Add compute.
- You possibly can create a brand new compute useful resource or select an present one. For this submit, we select Connect with present compute sources, then select Subsequent.
- Select the kind of compute useful resource you wish to add, then select Subsequent. For this submit, we select Redshift Serverless.
- Underneath Connection properties, present the JDBC URL or the compute you wish to add, which is built-in with IAM Identification Middle. If the compute useful resource is in the identical account as your SageMaker Unified Studio undertaking, you may choose the compute useful resource from the dropdown menu. In our instance, we use the patron account that was simply provisioned.
- Underneath Authentication, choose IAM Identification Middle.
- For Title, enter the title of the Redshift Serverless or provisioned cluster you wish to add.
- For Description, enter an outline of the compute useful resource.
- Select Add compute.

The SageMaker Unified Studio Mission Compute and Information pages will now show data for that useful resource.
If all the things is configured accurately, your compute can be created utilizing IAM Identification Middle. As a result of your IdP credentials are already cached when you’re logged in to SageMaker Unified Studio, it makes use of the identical credentials and creates the compute.
Take a look at information entry utilizing Amazon Redshift
When Ethan logs in to SageMaker Unified Studio utilizing IAM Identification Middle authentication, he efficiently federates and might entry buyer information from all nations however just for non-sensitive columns. Let’s connect with Amazon Redshift in SageMaker Unified Studio by following these steps:
- Select Actions and select Open Question editor.
- Select Redshift within the Information explorer pane.
- Run the client gross sales calculation question to watch that consumer Ethan (a knowledge analyst) can entry buyer information from all nations however solely non-sensitive columns (
id,birth_country,product_id):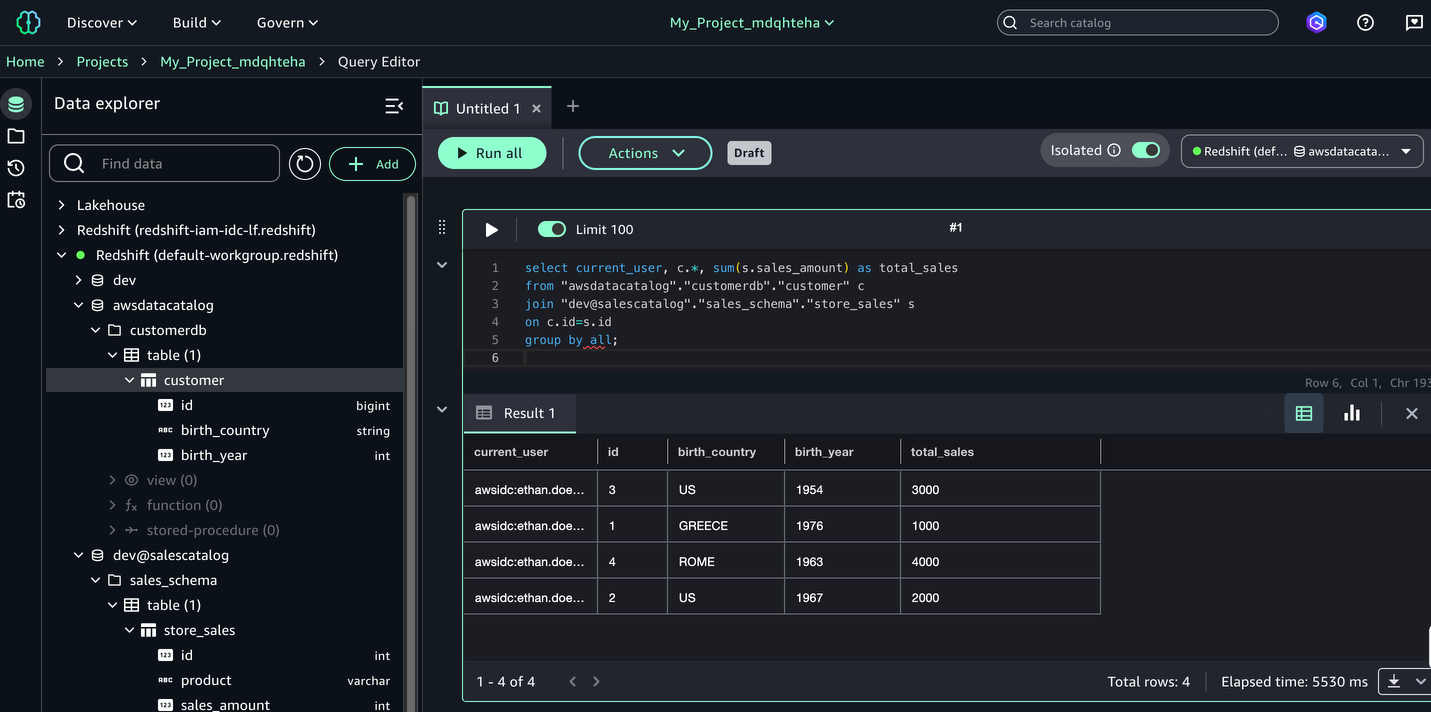
You’ve gotten efficiently configured Redshift to make use of IAM Identification Middle authentication in SageMaker Unified Studio.
Validate information entry utilizing Amazon Athena
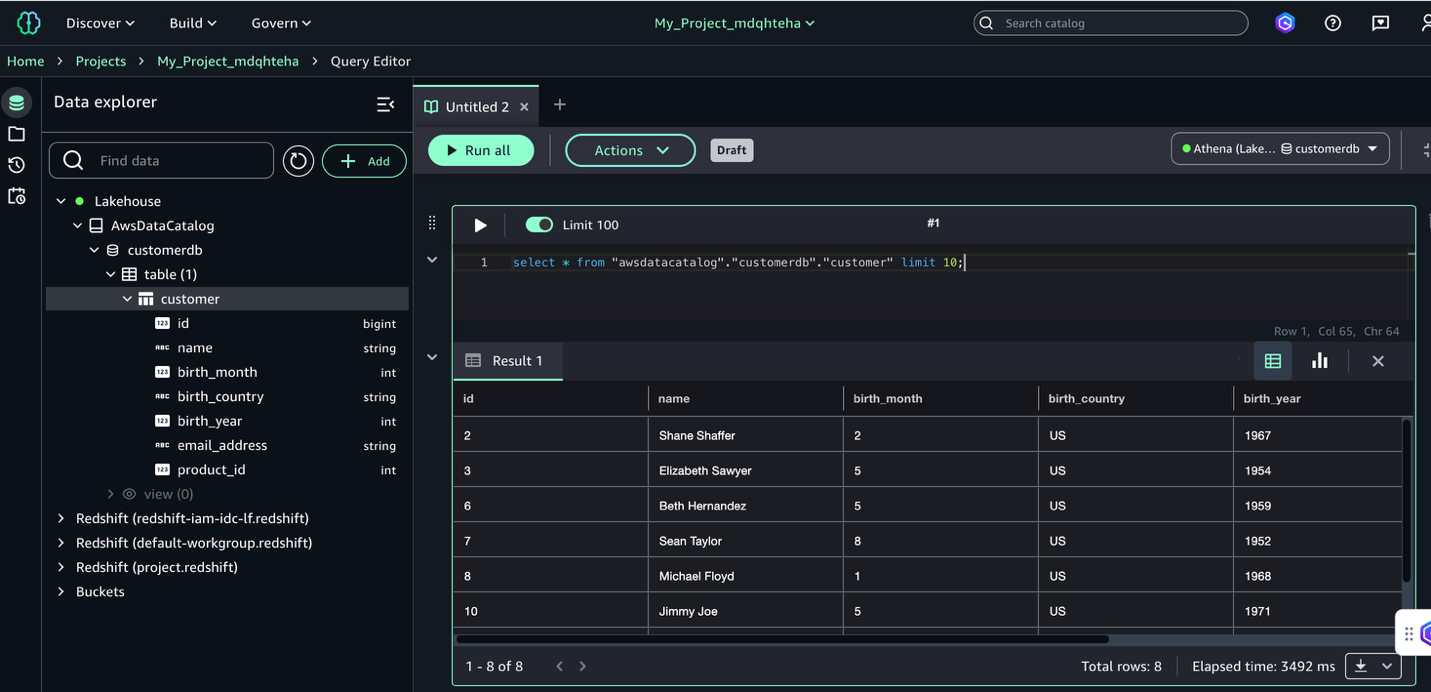
When Frank logs in to SageMaker Unified Studio utilizing IAM Identification Middle authentication, he efficiently federates and might entry buyer information just for america. To question with Athena, full the next steps:
- Select Actions and select Open Question editor.
- Select Lakehouse within the Information explorer pane.
- Discover
AwsDataCatalog, develop the database, select the respective desk, and on the choices menu (three dots), select Preview information.
The next demonstration illustrates how consumer Frank, a BI analyst, can carry out SQL evaluation utilizing Athena. On account of row-level filtering applied by means of Lake Formation, Frank’s entry is restricted to buyer information from america solely. Moreover, you may observe that within the Information explorer pane, Frank can solely view the customerdb database. The dev@salescatalog database is just not seen to Frank as a result of no entry has been granted to his respective group from Lake Formation.
The IAM Identification Middle authentication integration is full; you should use each Amazon Redshift and Athena by means of SageMaker Unified Studio in a simplified, all-in-one interface.Notice that, on the time of writing, Athena doesn’t work with Redshift Managed Storage (RMS).
Clear up
Full the next steps to wash up the sources you created as a part of this submit:
- Delete the info from the S3 bucket.
- Delete the Information Catalog objects.
- Delete the Lake Formation sources and Athena account.
- Delete the SageMaker Unified Studio undertaking and related area.
- In the event you created new Redshift cluster for testing this resolution, delete the cluster.
Conclusion
On this submit, we supplied a complete information to enabling trusted id propagation inside SageMaker Unified Studio. We coated the setup of a SageMaker Unified Studio area with SSO, the creation of tailor-made tasks, environment friendly consumer onboarding with acceptable permissions, and the administration of AWS Glue and Amazon Redshift managed catalog permissions utilizing Lake Formation. Via sensible examples, we demonstrated methods to use each Amazon Redshift and Athena inside SageMaker Unified Studio, showcasing safe information entry and evaluation capabilities. This strategy helps organizations preserve strict id controls whereas serving to information scientists and analysts derive precious insights from each information lake and information warehouse environments, supporting each safety and productiveness in machine studying workflows.
For extra data on this integration, seek advice from Trusted id propagation.
Concerning the authors
